什么是二进制
世界上有10种人:一种是懂得二进制的,另一种是不懂二进制的
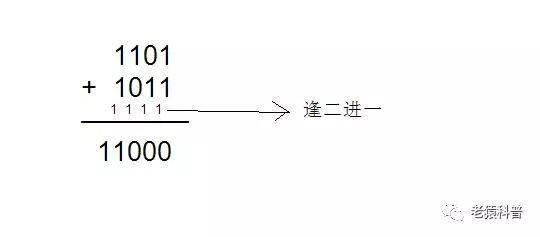
二进制是计算技术中广泛采用的一种数制。二进制数据是用0和1两个数码来表示的数。它的基数为2,进位规则是“逢二进一”,借位规则是“借一当二”,由18世纪德国数理哲学大师莱布尼兹发现。当前的计算机系统使用的基本上是二进制系统。
十进制0至9的二进制表示:
十进制 二进制
0 0
1 1
2 10
3 11
4 100
5 101
6 110
7 111
8 1000
9 1001
1 | 加法: 0+0=0;0+1=1;1+0=1;1+1=10 |
8位二进制数
256 128 64 32 16 8 4 2 1___ ___ __ __ __ _ _ _ _
如何得到二进制
e.g. 将125转化成二进制 1111101
可以使用短除法得到125的二进制值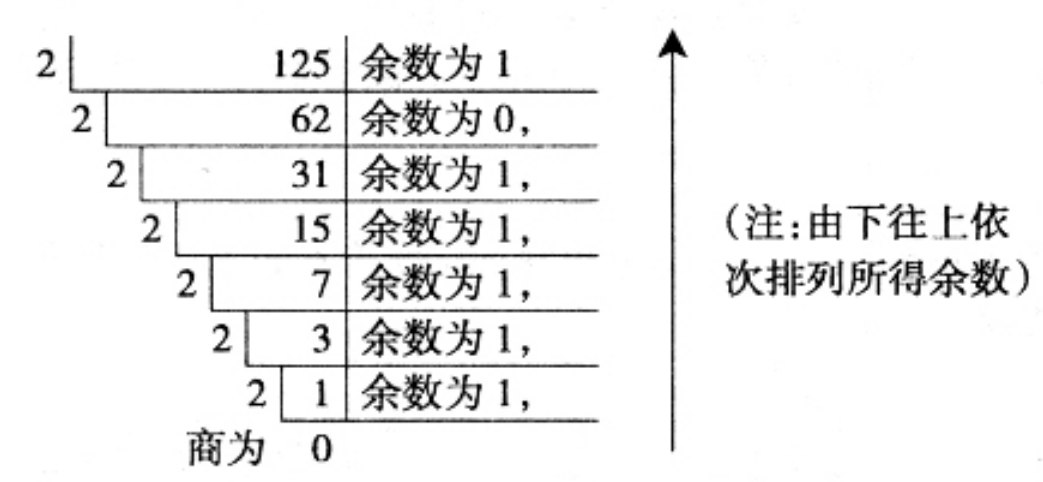
1. 按位或 |
|与||操作符的道理也是一样的,只要两个数中有一个数为1,结果就为1,其他则为0
1. 按位与 &
&运算符表示只有两个数的值为1时,才返回1
使用场景:我们管理系统做表单checkbox多选是,加入我们有a、b、c、d四个chebox的选项,1,2,4,8分别代表checkbox的value值,当我们全选a + b + c + d的时候,可以将1 | 2 | 4 | 8 = 15传给java后台,如果只选择a + c的时候,则传递给java后台的值为1 | 4 = 5。
那么我们做编辑功能的时候,如何判断checkbox是否被选中?很简单,用&符号就可以,比如用户选择了a+c,后台给我们返回5,c的值为1,那么 4 & 5 = 4, b的选项我们是没有选择的,则 2 & 5 = 0,也就是说,选中的通过&的运算值为>0的值,没有选中的将会为0。
1 | 1 | 2 | 4 | 8 = 15 |
按位异或 ^
两个操作数相应的比特位有且只有一个1时,结果为1,否则为0
使用场景:
(1)假如我们通过某个条件来切换一个值为0或者11
2
3
4
5
6
7
8//普通的写法
function update(toggle) {
var num = toggle ? 1 : 0;
console.log(num)
}
update(true);
// 通过异或我们可以这么写
num = num ^ 1; //num为true的返回 0, 为 false返回1
(2)可以在不使用第三变量的值的情况下交换两个变量的值1
2
3
4
5
6let a = 5,
b = 6;
a = a ^ b;
b = a ^ b;
a = a ^ b;